

Video tutorials can be extremely helpful, or extremely useless. It all comes down to how you create them. In this guide, we offer actionable video tutorial tips across different categories including strategizing, filming, and sharing your videos.
30,000 hours of video are uploaded to YouTube every hour, and it’s safe to say that a fair amount of these videos will be tutorials. Plus, with the rise of remote work, millions of online workers are sending asynchronous videos back and forth each and every day to cut back on meetings and improve their productivity.
Whether you’re creating short and sweet tutorials for your audience or sending instructional videos to your team members, we’ve got the guidance you need to be successful.
Content Tips
A great video tutorial starts with well-structured content. Here’s how to make your videos awesome:
1. Choose one purpose for each tutorial
Don’t try to achieve too many things in one tutorial. It’s better to create a series of tutorials that each cover a small amount of information, rather than to create one monster tutorial. Why? Attention spans are on the decline. So, choose one goal for each tutorial. For example, you might make a video to teach someone how to enter SEO metadata in Yoast, or how to move crypto from Coinbase to Crypto.com. Of course, some activities include multiple steps, and that’s fine. Just make sure you have one purpose.
2. Clarify the audience
Who will be watching this video? How knowledgeable are they about the subject matter? Consider whether your audience members are beginners, experts, or in between. This will help you include the right information (without telling people things they already know and boring them to sleep).
3. Decide on the structure of the tutorial
Consider the over overarching structure of the tutorial.
Here are some examples of structures:
- Beginning, middle, and end
- A set numbers of steps
- A simple, one-step process
- Problem/solution
- A simple trick and why someone should use it
With a clear structure in place, you’ll be able to create a shorter, more succinct video tutorial that will capture the viewer’s attention.
4. Create a script or outline
Before you start filming, write out either a script or an outline. If the video will be viewed by lots of people, a script will ensure that the video is as clear and high-quality as possible. Of course, you don’t have to read the script exactly while filming, but simply having a script can help you practice and stay on track.
Or, if you’d rather wing it a bit more, simply create an outline. For example, an outline for a tutorial on how to create a Facebook lookalike could look something like this:
- Log into your Facebook ads account
- Create a new campaign and set the budget
- Select your top-performing audience
- Create a lookalike audience
- Write new ad copy or choose your top-performing ads
- Turn the campaign on
5. Prepare the materials you need before you film
Before you start recording the video tutorial, consider everything you’ll need to film. For example, if you’re sharing a digital process, have all of the tabs and programs open that you need. If you’re filming a hands-on tutorial about how to create a blue and gold abstract painting, collect all of the supplies. Run through the process in your mind to make sure you have everything.
Filming Tips
The quality of your video tutorial is largely determined during the filming process. Here’s how to film like a pro.
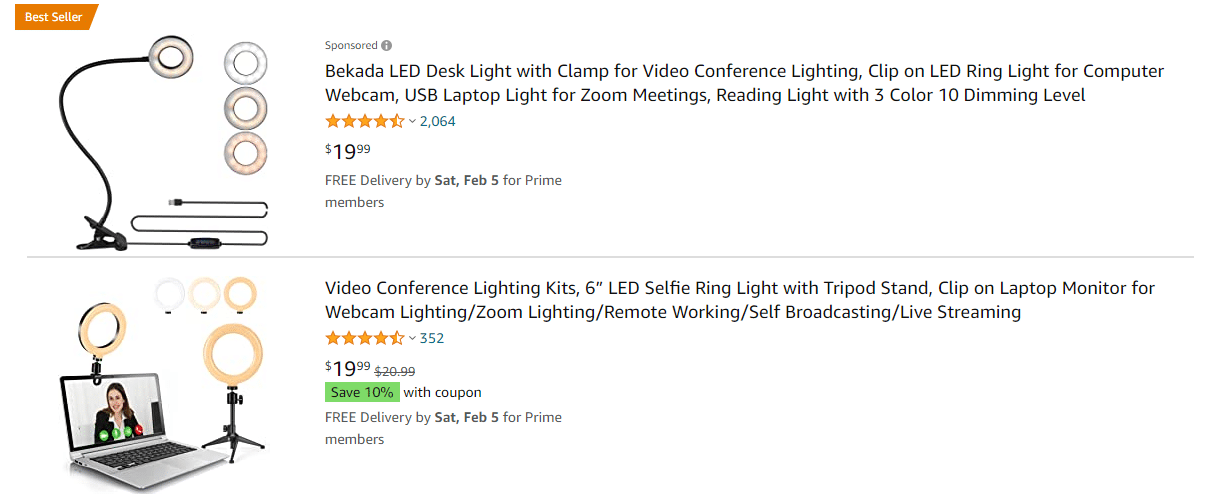
6. Get the lighting right
Great lighting can make up for an amateur camera. Ring lights are affordable and have a major impact on the quality of your videos. This ring light by Bekada is a best seller on Amazon, and this option from Baivinet also has great reviews.
Or, if you have sunlight that streams into your window at a certain time, then make use of it.
7. Check your outline or script without allowing it to become a distraction
Remember that outline or script you made? Now it’s time to follow it. Print it out and pin it where you can see it, or use a teleprompter app (just search for one in the Apple or Android app store).
If you find that checking the outline or script is negatively affecting the speed and pace of your filming, then memorize it instead.
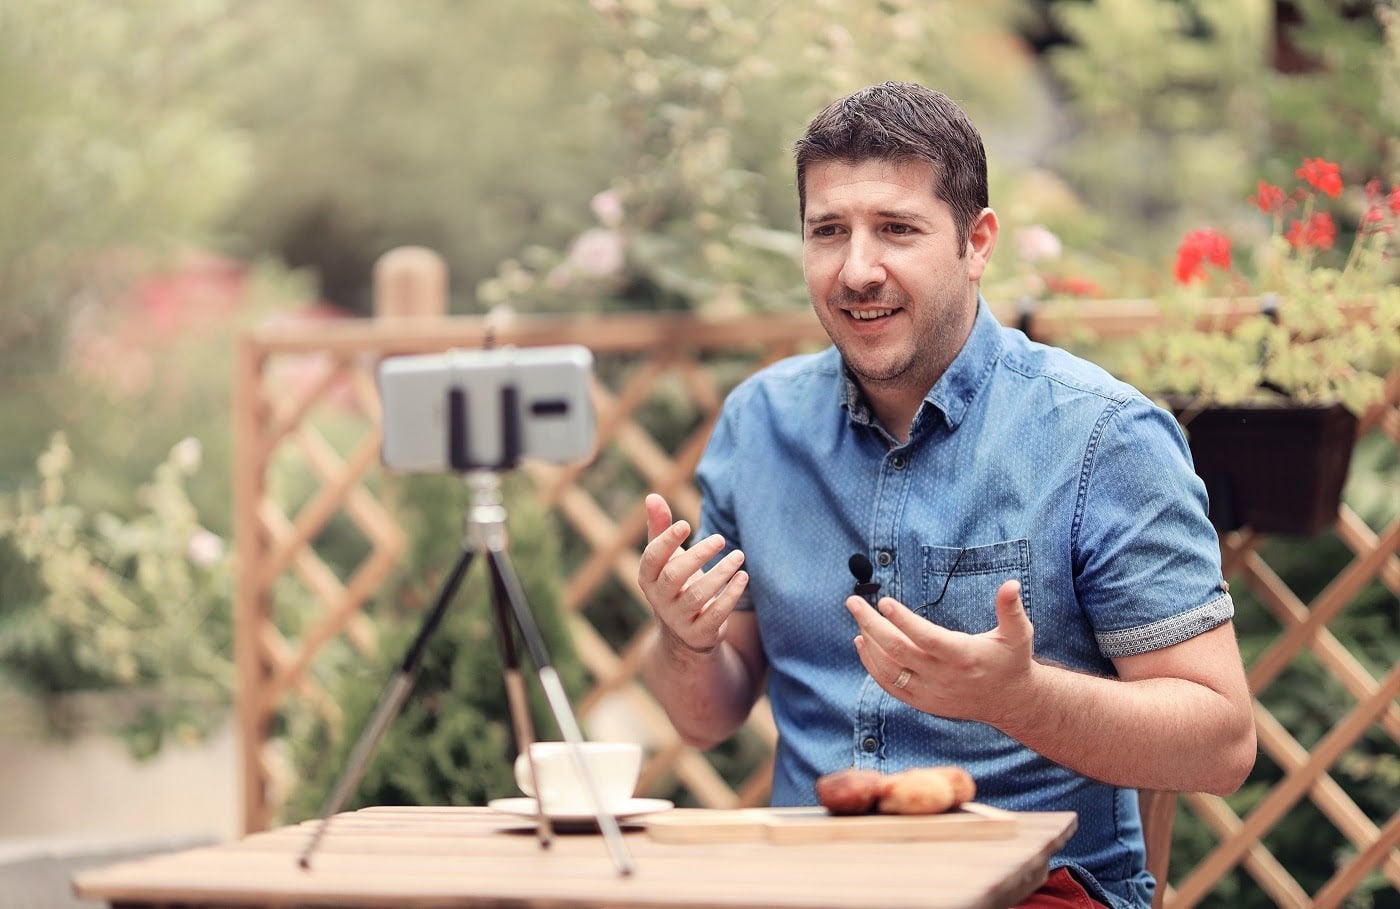
8. Use a podcaster mic or lapel mic for better audio
As with lighting, audio is a huge contributor to overall video quality. For best results, use a mic that is as close to your mouth as possible. Podcasting microphones, which can be plugged into your computer via USB, and lapel mics, which you clip to your clothes, are both great options.
9. Reduce background noise as much as possible
Your air conditioner, dog, laptop fan, and neighborhood traffic can all contribute to poor audio quality. Before you start filming, take a pause and listen to the sounds around you. Take an effort to reduce any background noise within your control. If there’s an unusual amount of noise, such as heavy traffic due to commuter hour, then film your video at a different time or location.
10. Test your audio before filming
Make sure to test your audio before filming. Record yourself talking for 15 – 20 seconds, then playback the video in a silent room, or with headphones. Is the audio working? Are there any background noises that you can take care of? Fix whatever needs fixing before you spend minutes or hours filming your tutorial.
11. Be as specific as possible
Great writers and public speakers have one thing in common: they know how to be specific. Details and examples make for great content. Keep this in mind as you’re filming, and make the content as real as possible. This will ensure that it comes across as a true tutorial and not a bunch of rambling.
Tech and equipment tips for digital tutorials
Digital tutorials are those that cover processes that people can do with their devices (computers, phones, etc.). Here’s how to make these types of tutorials great.
12. Use screen sharing often
Doesn’t it drive you crazy when someone talks about how to do something without sharing their screen and showing you how to do it? (It drives us crazy too.) Use a screen sharing tool like Weet to share your screen and show the exact steps in your tutorial. Weet allows you to include a small video of yourself in the corner to personalize and humanize the content.
13. Don’t overcomplicate the tech (use simple tools)
To make things simple and easy for everyone, use a tool that allows you to create, edit, share, and comment on video tutorials.
With Weet, you can record video tutorials, trim and clip them, send them to people on your team with a shareable link, and comment via text or additional videos.
Here’s how to create a video tutorial with Weet:
14. Tech and equipment tips for physical tutorials
Tutorials for physical processes are a bit different. For the most part, these require that you film yourself doing something, rather than share your screen. Here are some tips to help you succeed:
15. Shoot with your webcam or phone if you don’t have a professional camera
You don’t have to have a two-thousand-dollar camera to film great tutorials. Rely on your computers’ webcam or your mobile phone. Just make sure you follow our tips above on how to set up great lighting and capture quality audio.
Tip: Try Weet for webcam videos. It comes with easy editing, sharing, and commenting features!
16. Use a tripod
People want to see you moving, not the camera. Too much wobbling can make people feel frustrated, or even dizzy. Tripods are very affordable and mobile phone tripods can be purchased for around $20.
17. Shoot the tutorial in segments
When you try to shoot the tutorial in one go, you put too much pressure on yourself. Instead, consider the structure or outline of your tutorial and break it up into smaller segments.
For example, you might first film yourself selecting paint colors and talking about the strategy behind pairing different colors together. Then, take a break and later film yourself painting the background of your canvas. And so on. By taking breaks, you’ll maintain your sanity, get the filming done faster, and make editing quicker too (you can just trim the ends of the clips and string them together.)
Editing and production tips
Depending on the type of tutorial you’re creating and how many people will view it, you might spend no time at all on editing and production, or you might spend hours. Here are some tips to help you either way.
5. Easily record a video tutorial
18. Trim the ends
One of the worst mistakes you can make is failing to trim the video. Attention spans are a mere 8 seconds, and in today’s world of micro-content, even that statistic seems generous. Make sure to trim the video so it starts when you start talking and ends when you stop.
If you’re stringing together multiple clips, make sure to trim their ends as well.
19. Add named chapters to the video
Make it easy for people to skim the video and find the exact step or tip they’re looking for. To do this, give your videos chapter names in whatever tool you’re using. This is a very common practice for YouTube tutorials.
Tip: You can add chapters to your Weets!
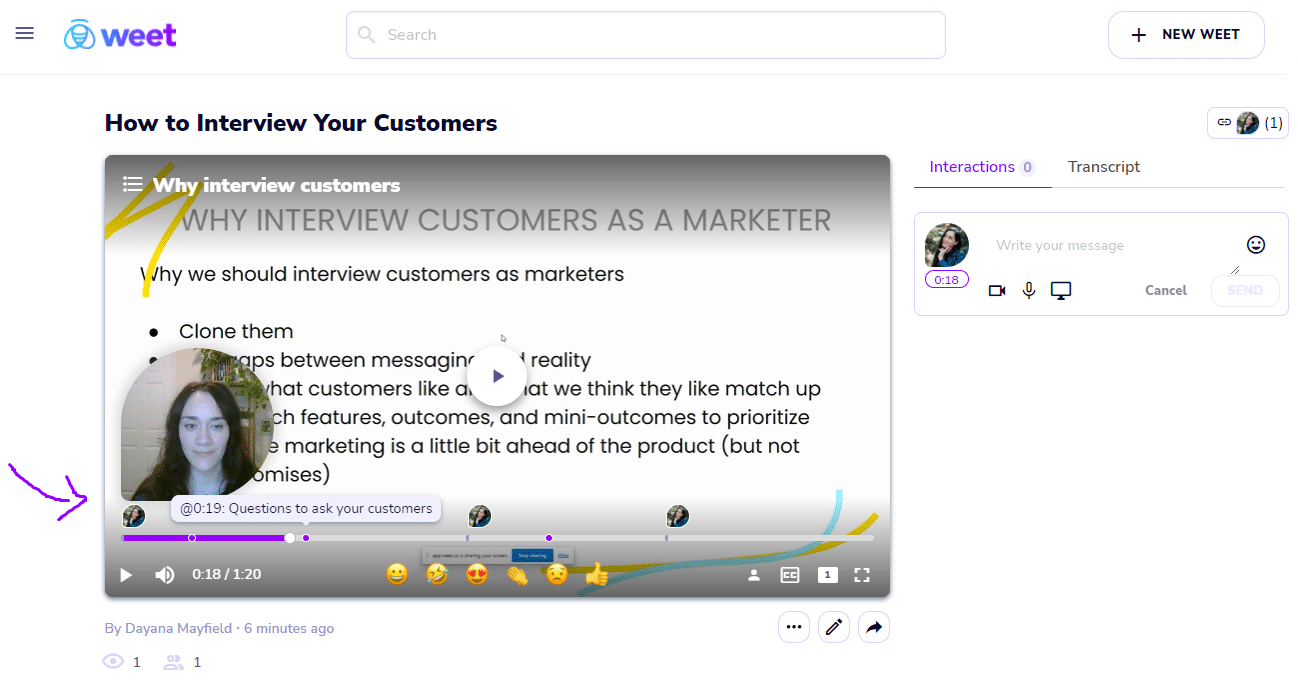
Viewers can scroll over the video progress bar to see the names of the different chapters.
Plus, if they click the name of any chapter in the progress bar, the name will also show up at the top of the video while they’re watching.
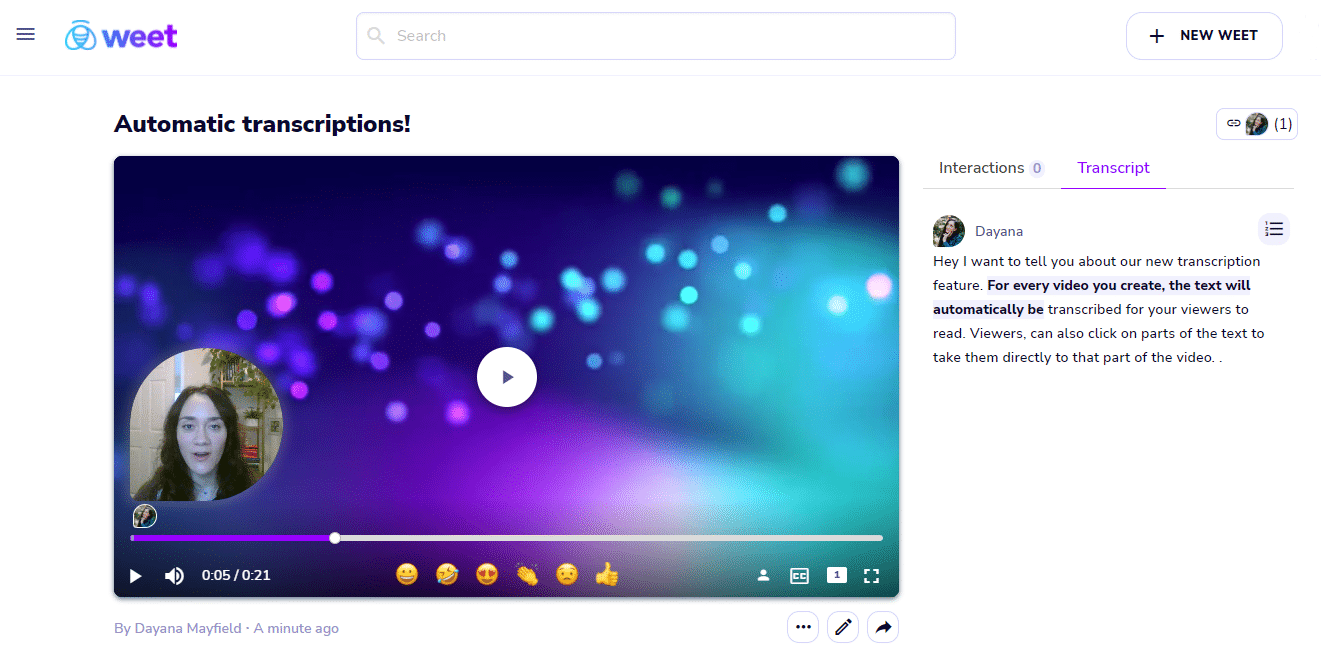
20. Get the audio transcribed (or transcribe it yourself)
Transcriptions are very useful. Some of your viewers might be hearing impaired. Others will prefer reading as their main learning style. Be sure to include transcriptions for your video tutorials.
Tip: Weet automatically transcribes all your videos and adds the text to the Transcript tab, where viewers can click on the text to take them to that part of the video.
Employee training tips
Employee video trainings have been popular for decades as a way to scale training across a company. And now with the rise of remote work, tutorial videos are more useful than ever.
21. Don’t procrastinate–focus on progress over perfection
Many people don’t feel comfortable on video. If that sounds like you, then you might find yourself procrastinating making a training video simply because you feel self-conscious or worried that it won’t turn out well. Bear in mind the purpose of the video (to train your colleagues), and don’t worry about perfection. It’s better to get it done quickly, so everyone can get to work and be on the same page.
22. Don’t fuss over the production value unless the video will be sent out company-wide
Unless you’re making a video that will be shared with hundreds or even thousands of employees, don’t worry too much about the production value. You don’t need a film crew or bells and whistles. Just use an easy video filming tool like Weet to get it done.
23. Know when to make your tutorial content evergreen
The word “evergreen” typically refers to trees. Well, in business and marketing, “evergreen” refers to a piece of content that can last for at least a couple of years.
When making an employee tutorial, consider whether or not you should keep it evergreen. For example, if it’s for the office manager and it’s an important process, don’t mention the person’s name. This way, you can reuse the video if they leave and someone else fills their role.
Not every video needs to be evergreen. The point is to decide whether or not it is evergreen before you film it.
24. Get feedback on the script or outline before filming
If you’re creating a video tutorial for lots of employees, get feedback on your script or outline from other stakeholders before filming. For example, if you’re teaching grocery baggers the correct way to bag items without damaging them, make sure that your colleagues in the employee education department have signed off on the script. This way, you can include as much feedback upfront as possible and minimize the chances of having to refilm if you left something out.
25. Rollout the tutorial in phases to be sure it’s helpful
For tutorial videos that will be rolled out across hundreds of employees, it’s smart to roll it out in phases. For example, if you’re training customer service representatives, you might want to send it to only 30 reps first, get their feedback and questions, and revise the video if needed before sending it to everyone.
26. Add the video to an employee training LMS or cloud folder
When your video is finished, you should include it in a resource library that employees can access at any time. This might be a dedicated employee learning management system like Tranual or something as simple as a Google Drive folder. In any case, make sure all of the videos have a sensible title, so they’re easy to search for.
Tip: If you’re using Weet, you can share your videos with all of the right people on your team. When they login, they can see all of the videos shared with them, so you’ll automatically be creating a video tutorial library!
27. Include the video in relevant SOPs
If you use standard operating procedures (SOPs), which are documents that detail steps for completing important tasks, then you can add video tutorials to these documents to make them more useful.
28. Use a tool that lets you share videos with links (no uploading or downloading required)
In today’s online working environment, employees need to send quick tutorials on the fly. That’s why you should use a tool like Weet that allows you to share links to your tutorial videos, so no one has to download or upload anything.
29. Make changes to the video if needed, without changing the unique link
Sometimes, you forget something important in your tutorial. Or the process you’re teaching has changed. Make sure to utilize a video tutorial tool that allows you to add new clips or refilm the entire video, without having to change the link. This way, employees can still rely on the link you originally shared.
Tip: With Weet, you can share video tutorial links back and forth and edit your videos whenever!
Social media tutorial tiips
These days, many people create video tutorials in order to grow their audience on social media. Here are some tips for creating great content for YouTube and TikTok.
30. Include attention-grabbing sounds and visuals
The best YouTubers know that you need to hold onto viewers’ attention by surprising them with continued angle changes, new visuals, and unexpected sounds.
For example, Moriah Elizabeth’s art tutorial videos often include funny sounds, manipulations of her voice, and tons of movement on-screen.
31. Add royalty-free music
There are tons of royalty-free music repositories, such as Bensound, Taketons, and Videvo. Background music can make your video more interesting, but it can also be distracting so choose wisely. Make sure to read the comments section, because your viewers will be sure to let you know if your selections are flopping.
32. Create a branded style consistent across all of your tutorial videos
The best video tutorial content creators have a brand style. Maybe their style is dark and mysterious, or funny and wacky. Define your own style so that you can connect emotionally with your audience and keep them coming back for more of your tutorials.
33. Study tutorial creators outside of your niche
To be successful on social media, you need to stand out from the crowd and zig where others are zagging. Look to other niches to get ideas. For example, if you create tech tutorials, you might watch art tutorials to get ideas for how to shoot the products and equipment you’re recommending.
Not all tutorials are worth watching. Follow these tips, and your videos will capture attention and achieve your desired goals.
Start making great tutorials of any kind with our video tutorial app.